Tuesday, February 26, 2013

Hi, today I am sharing a fun packed album with lots of movement and pop-up pages.  It is made from the MME Good Day Sunshine girl collection.  Even it is a girl collection, the colour and images are very flexible and I am using it to make an album to capture some of the fun stuffs Nida's boy enjoyed.

Here are so of the highlights from the album.
Once the "FUN with Friends" is flipped open, the houses popped up.
 I have also incorporated some water scene where the boat can be pulled for some added movement in the album.      
Also, some interesting carnival scene with more surprises.
Key Supplies:
  • My Mind's Eye Good Day Sunshine
  • My Mind's Eye On the Sunnly Side (for those little bikes)
  • Distress Ink (Spun Sugar, Tumble Grass)
  • Distress Markers (Worn Lipstick, Barn Door, Peeled Paint, Broken China)
  • Crop-a-dile Corner Chompers (1/4" round Corner, Scallop/Cloud Cut, Stub/Deco Cut)
  • Die-Versions "A hint of Lime"
  • Cottage Cutz Dies (Sugar & Cream Alphabet, Game Booth, Ferris Wheels, Ticket Booth)
  • Lil Inker Designs Ballon die


Do drop by Papier to check out more interesting elements in the album.

Happy Scrapping!
Mee Foon


Monday, February 25, 2013

Art & Love: A mini album

Do you find you sometimes scour the oddest places to find bits and bobs you can use for papercrafting? Flea markets are great and I especially love second hand book stores. I found a lovely, yellowing book on poetry and paintings depicting love in a secondhand bookstore and knew it would be just perfect to be turned into something crafty.

This month's DT kit featured a lovely chipboard album seemed to be just the base I was looking for: to be turned into a tome on love!

My first ever effort at a mini album: Art and Love.


It's such a chock-ful of 3d elements that it can barely keep closed!

These are just some of my favourite pages. There are just too many to feature them all here! I used many tools and techniques in this one but my favourite was the shiny Martha Stewart paints that formed the base. I slathered on the paint on the chipboard and it made a gorgeous finish to be stamped on. The contrasting black Archival ink was just perfect.

The paint even worked great on the plaster flower Melissa Frances embellishments!

The item list is going to be long so bear with me!

1. Martha Stewart paint in metallic copper, metallic rust and pearl holly berry
2. Webster's Pages petite papers (In Love, Palm Beach and Game On - Feb DT kit)
3. Melissa Frances Rose Flower embellishments (Feb DT kit)
4. Kaisercraft pearls in copper
5. Kaisercraft metal key embellishments with epoxy stickers
6. Tim Holtz stamps  (nature's discovery)
7. Prima Almanac journaling cards
8. Kaisercraft Basics rhinestones
9. Liquid pearls
10. Spellbinders Fleur de Lis Frames dies
11. Tim Holtz bird in cage die
12. Zing! Metallic Gold and clear embossing powder
13. Distress embossing powder
14. Black lace ribbon*
15. gold leaf embellishments*
16. Cameo cabochons*
17. assorted satin ribbon*

(Save for the last four items marked*, all items are from Papier - whilst stocks last)


Friday, February 22, 2013

Capturing the everyday life...Project Life

I am so in love with my ongoing project which is what else "Project Life"!!! Totally in awe with all the crafters, scrapbookers, memory keepers out there that are also involved in this Project Life/PL.  I love to see others PL as different crafters, they do different kinds of PL spread and so many possibilities with Project Life.

My last year Project Life was by month and when I flipped my 2012 binder I can't stop smiling looking at all those pictures and journals. It is precious!!!

Today I am sharing with you my Project Life from my Week 3, Week 4 and Week 5.


I love printing my photos and putting all of the embellishments, buttons, doilies, washi and everything I can on my page.  I know some of you Project Lifers out there love the clean and simple look, well it is entirely up to you...my spread are just a mixture of everything.

Don't forget to join our Project Life crops every Saturday at Papier, The Curve. You can get so much ideas and share loads of techniques. Happy crafting!

Thursday, February 21, 2013

Tutorial on Martha Stewart painting tools

Hi there! Today, I'm going to do a simple tutorial on the Martha Stewart's various painting tools to create an art journal page. If you're not into art journal, that's completely ok. You can apply these methods to create your own scrapbook background designs too. Without further ado, let us begin.

This (below) is my art journal page, which was initially a blank white water colour paper (300gms). I have given it a brown coat of MS paint. The paint was diluted with water before I applied on the page. MS paints are really quite thick. If you prefer without much dilution, thats fine cos its entirely up to you.

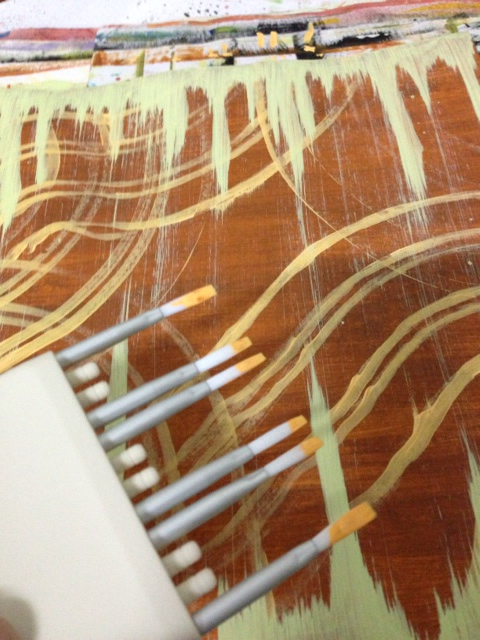
Then, using the adjustable stripping brush, I have created the yellow wavy lines. ( in a picture later too). What's great about this adjustable stripping brush is that..well...it's adjustable! You can design your own wavy lines by rearranging the brushes between each other. Cool eh? Ok, let us move on.

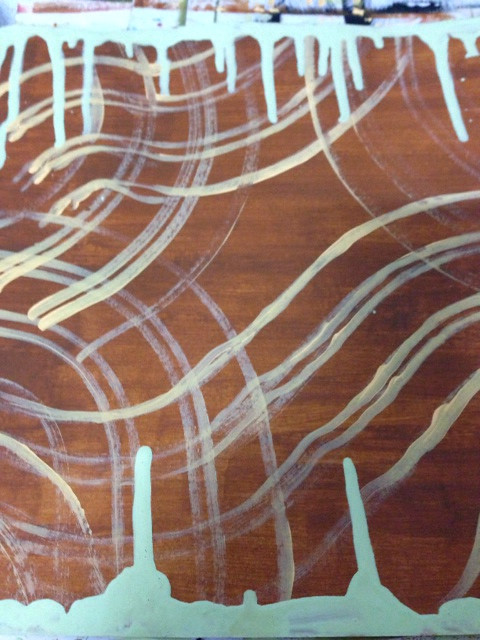
Now, I have used a green paint, dilute a little and bring it onto the edge of the top and bottom page. One edge at a time. Don't ask me why I have used green and brown..lol! I guess I have extra bottles of greens that I need to rid off quick! Hehe..

Ok, then let the paint drip down by tilting your page. Make sure you have enough water to let the paint drips. Like I said before , MS paints are quite thick. Too much water, will make the paint be too runny. My trick is, lift up the paint with brush and wait until it drips. If it drips the moment you lift up the brush, then it's too much of water. If it drips, say, about 5 secs later; then you're good to go. You can see below the result of this.

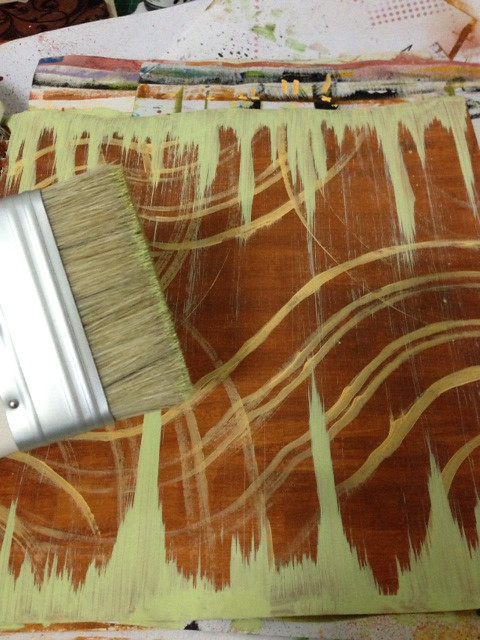
Now, before the green paint dries, we will use the dragging brush to swipe the paints over. You can see the streaks of green paints over the whole page as you drag it with this brush. So cool! Let it dry a little while. You can use heat gun to dry too.

Ok, remember the first effect earlier? Below, is the adjustable stripping brush that I have used. It comes with 12 small brushes, which can be taken out to suit your designs. Tip: make sure your pallette is the flat kind or have a flat surface so that you can sweep off equal paints on all the brushes. You will know what I mean when you try it. Lol!

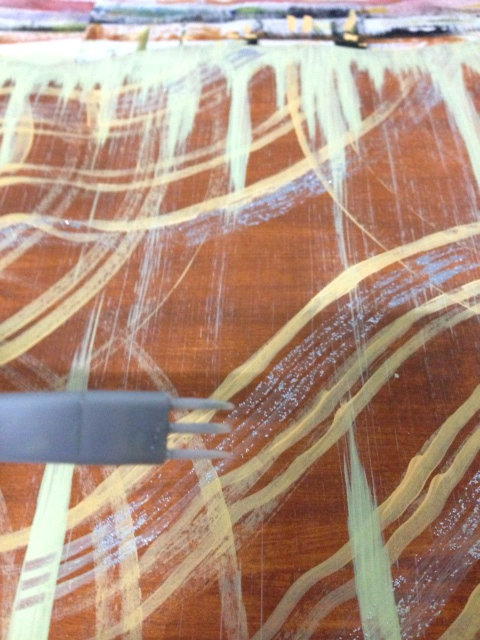
For the effects below, I have used the patterning brush set, which comes with 4 different designs. If you can see, I have used the glitter paint with this brush and applied it onto my art journal page.

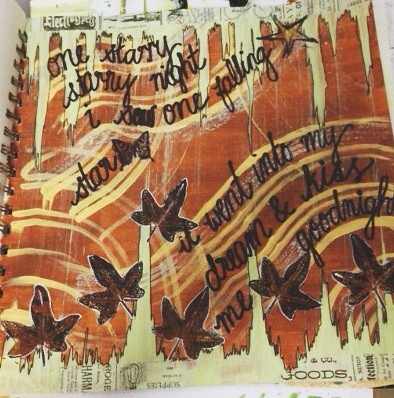
Well, and lastly, here's how the final art journal turned out to be. I've added stamping, doodling and journalling to finalize my art journal page. As usual, i always have a reason why I create an art journal page and this time, it is about the latest meteor that hits Russia. That streaks of green paints somehow reminds me of the light streaks that the meteor made as it glides onto the atmosphere. Perfect!

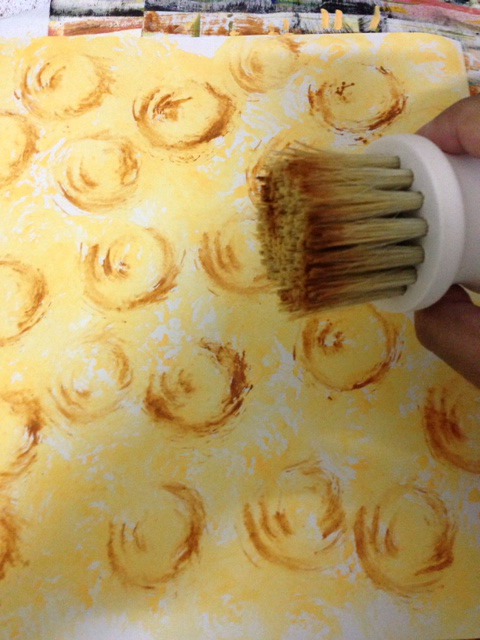
Oh ..and... a bonus post down here..hehe...can't help it to share with you another tool that I find very very cool! The stippling brush and the grain stripping comb. See the effects below when you dab some paints onto the stippling brush and twist it as you apply on your page.

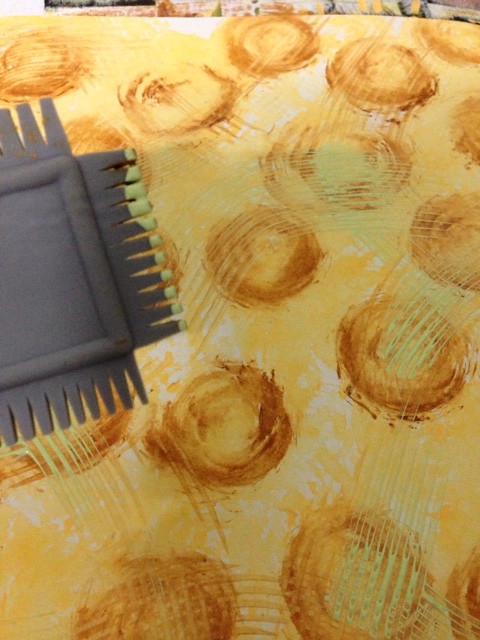
And just look at the effects given by the grain striping comb. Just swipe the paint with it and voila! You get awesomeness! Lol!

Bigger 'tooth' on this one below.

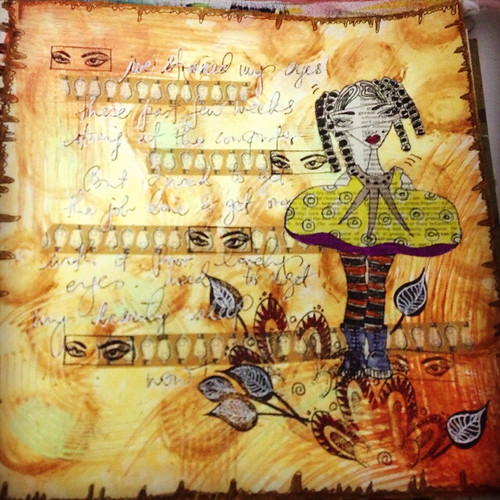
And here's how it finally turned out.

Ok folks. Yeap, I'm really signing off now. Hehe..

Don't be afraid to get messy ok! Have fun playing with your paints!

See you next time. Ciao!


Wednesday, February 20, 2013

Flipchart using Kaisercraft Mini Square Album

Hey there lovely ladies! How many of us have come across pretty wooden mini albums like this
 
and thought to ourselves, if only...this could be used for something other than the intended purpose.

Fret not, I have a simple project that this can be used for and I'm going to share it here with you. What I've made is actually a days of the week flipchart with some of my favourite quotes. You simply need to turn over the page a day at a time to reveal a proverb. 

First, adhere patterned paper on both sides of all 5 wooden chipboard pieces
Next, Stamp proverbs (or cut them out of magazines etc) and adhere
Embellish to your heart's content with some of your favourite embellishments

Here's how mine turned out


Materials Used:
Kaisercraft Wooden Mini Square Album
Distress inks
Sizzix 3D flower die
Fiskars Stamp


Embelli

Monday, February 18, 2013

Have a Lovely Day Layout


Monday is here again. Back to routine, I do hope your last weekend was a good resting point. Today i'm sharing a 8.5' x 11' layout. I have not done this size for quite sometime. A simple page of my girl having a lovely day out camping and river dipping with the family.


I used a lot of Paper tape for this page and rub on's too. Other material include, White Cardstock, Prima Pattern Paper, Prima Buttons, Pebbles Chip, Lost & Found Die Cuts, Stamp, Martha Stewart Paper Tape, Pink Paislee Old School Rubons and Writing paper. 


Stick around for more inspirations from the dt's. Have a good week.

Friday, February 15, 2013

Happenings on 16th Feb 2013

Hello all, here's what's happening at the store tomorrow. Please feel free to drop by and enjoyed a Project Life Crop Session in the morning and Paint Demo in the afternoon. Details as follows:

Project Life Crop Session

Date : 16th Feb 2013
Time: 11.00 am-12.30 pm
Dt In Charge : Kak Aini
* Please bring along your own PL kit and embellishment

Paint Demo

Date : 16th Feb 2013
Time: 2.00 pm-4.00 pm
Dt In Charge : Aznida

I hope to see you at the store tomorrow. Have a good day. :)

Project Life - My lil angel nieces

Hi peeps,

Gong Xi Fa Cai :)

I hope you have had a fabulous Chinese New Year celebrations or a good holidays. And lots of good food, get together with loved ones, catching up with old friends plus gifties cum Valentine celebrations yesterday.

As for me, I balik kampung to Sitiawan to spend time with family and as for Valentine, mine was rather eventful, including a trip to the archery centre :).. A fun day, no doubt ... and well all these will be perfect moments to be cherished and documented in project life.

However, for my Project Life today, I will be sharing today an after Christmas lil party where my angel nieces came by for a visit. I know it seems so far away, but it twas only a month and a half ago lol. Had such a lovely time with them. This two pages are all about their visit and the things that we did and enjoyed together. Precious!

I hope you enjoy them. :)

a little close up...
 the second page 
... close up...
my angels {heart}

So make sure you come by and join us for our Project Life crop sessions on Saturdays @ 11am. Join us in creating your memories and sharing of ideas. Call Papier Love to book a spot and join us today :). Lets craft together !

Materials
Project Life Album by Becky Higgins
Sleeves from Becky Higgins
Melissa Frances die cuts
My Mind Eyes Lost & Found embellishments
embellishments from stash


Thursday, February 14, 2013

For Keeps - an envelope album

I was given this envelope mini album to play with and what came immediately into my mind was how great this would be to keep for my PL photos once I get them printed. It would be a nice temporary storage until I have the time to arrange them all in my PL's album.

The album comes with 7+ 1 rectangular envelopes; perfect for the 7 days storage plus 1 more envelope where you can keep photos in random order of the days.

Papers, mini album, journalling tags and acrylic sheet are from the DT kit for this month and a bit of left overs from the previous months.

Below are peeks of how the inside looks.

If you like the papers and the journalling tags, you can get them at the store.

I have used distress inks by Ranger on a stencil for the envelope below. Add on my own handwriting. Lol! The alpha stickers are from Webster's Pages. Also available at the store! Punch? Well, it's by Martha Stewart and yes, you can find them all at the store too!

Thanks for stopping by! Have fun crafting!


Tuesday, February 12, 2013

Power of Dry Embossing technique

Hi, Mee Foon here again.  Happy Chinese New Year to fellow friends who celebrate this festive season and  an amazing holiday for everyone.

With Valentine around the corner, I made a card on the "LOVE" theme.  It is a quick and easy card and I must give the credits to my cute embossing folder.   As the background is filled with the embossed hearts, I kept the decoration to minimal.   It never cease to amaze me how one roll through the big shot machine can create such beautiful and deep embossed images with the Sizzix embossing folder.

Inside the card, I also embossed one side of the writing space with a notebook lines.   However, I have to admit my photography skill did unjustly to the image.  Do come to Papier to check out the beautiful notebook lines in person.
Supplies:
  • Sizzix Valentine Set #3 (656508)
  • Sizzix Collage & Notebook set (656647)
  • White and Pink (Pearlized) Cardstock
  • Felt
  • Metal Tricket
  • Ribbon

Stay tuned for more creation using the dry embossing technique.  Also look out for upcoming demo sessions on using paints (by our amazing DT Nida) and embossing technique (by yours truly).

Happy Scrapping....

Monday, February 11, 2013

Just a Little Oriental

Happy Chinese New Year, everyone! I hope you've all had a great celebration thus far reuniting with friends, family or just enjoying the long weekend.

Although a little late to be giving you CNY ideas, my project this week are two CNY card ideas using very un-CNY paper packs!

The mini paper pack in my DT kit this month is the Webster's Pages Triple Pack In Love, Palm Beach and Game On. The colours and patterns are so versatile I guarantee you will find many, many uses for them, just like I did.

1) Card One uses the lantern stamp from Graphic 45/Hampton Art Bird Song stamp pack. These have been stamped on patterned paper, cut out and embossed with clear embossing powder. The lanterns have been strung on basic red twine. The flowers have been cut using a Martha Stewart flower punch. The rhinestones are actually from my January DT kit, that I somehow could not fit in the earlier projects.

 For this project I used: 
  • Webster's Pages Triple Pack In Love, Palm Beach and Game On
  • Graphic 45/Hampton Art Bird Song Stamps
  • Prima Say it In Crystals
  • Martha Stewart flower punch
  • Distress stickles in Spun Sugar
  • Basic red twine
  • Hero Arts Hero Hues card base in reds

2) The second project was very simple. The cherry blossom stamp embossed in pink made a pretty centre piece for the card. The twine, basic rhinestones and oriental 'buttons' just finish it off.


For this project, I used:

  • Webster's Pages Triple Pack In Love, Palm Beach and Game On
  • Graphic 45/Hampton Art Bird Song Stamps
  • Bird Song Sticker sheet
  • Kaisercraft basic rhinestones
  • Zing embossing powder
  • Red twine
  • Scalloped scissors for edging.
  • Hero Arts Hero Hues card base in reds

* All items are available at Papier while stocks last.

Friday, February 8, 2013

January Project Life Pages


I'm all excited for the long weekend! Happy New Year to all my chinese friends and i hope you'll have a good celebration wherever you are. I'll be doing my weekly crop session tomorrow (9/2) at Papier. Feel free to join me for 1!/2 hours of crop. 


Here's sharing my last few pages of January PL. Yes in case some of you are wondering, i'm working on the mini pl instead of the 12x12 binder. I love decorating my pages. Some say it's like a mini layout! lol. Yes i have problems with space sometimes, which simply means i can't seems to leave a slot bare without embellishment. Oh well that's just how i do things. lol. 


Hopefully i'll see some of you tomorrow. Have a good holiday everyone. Happy makan! :)